
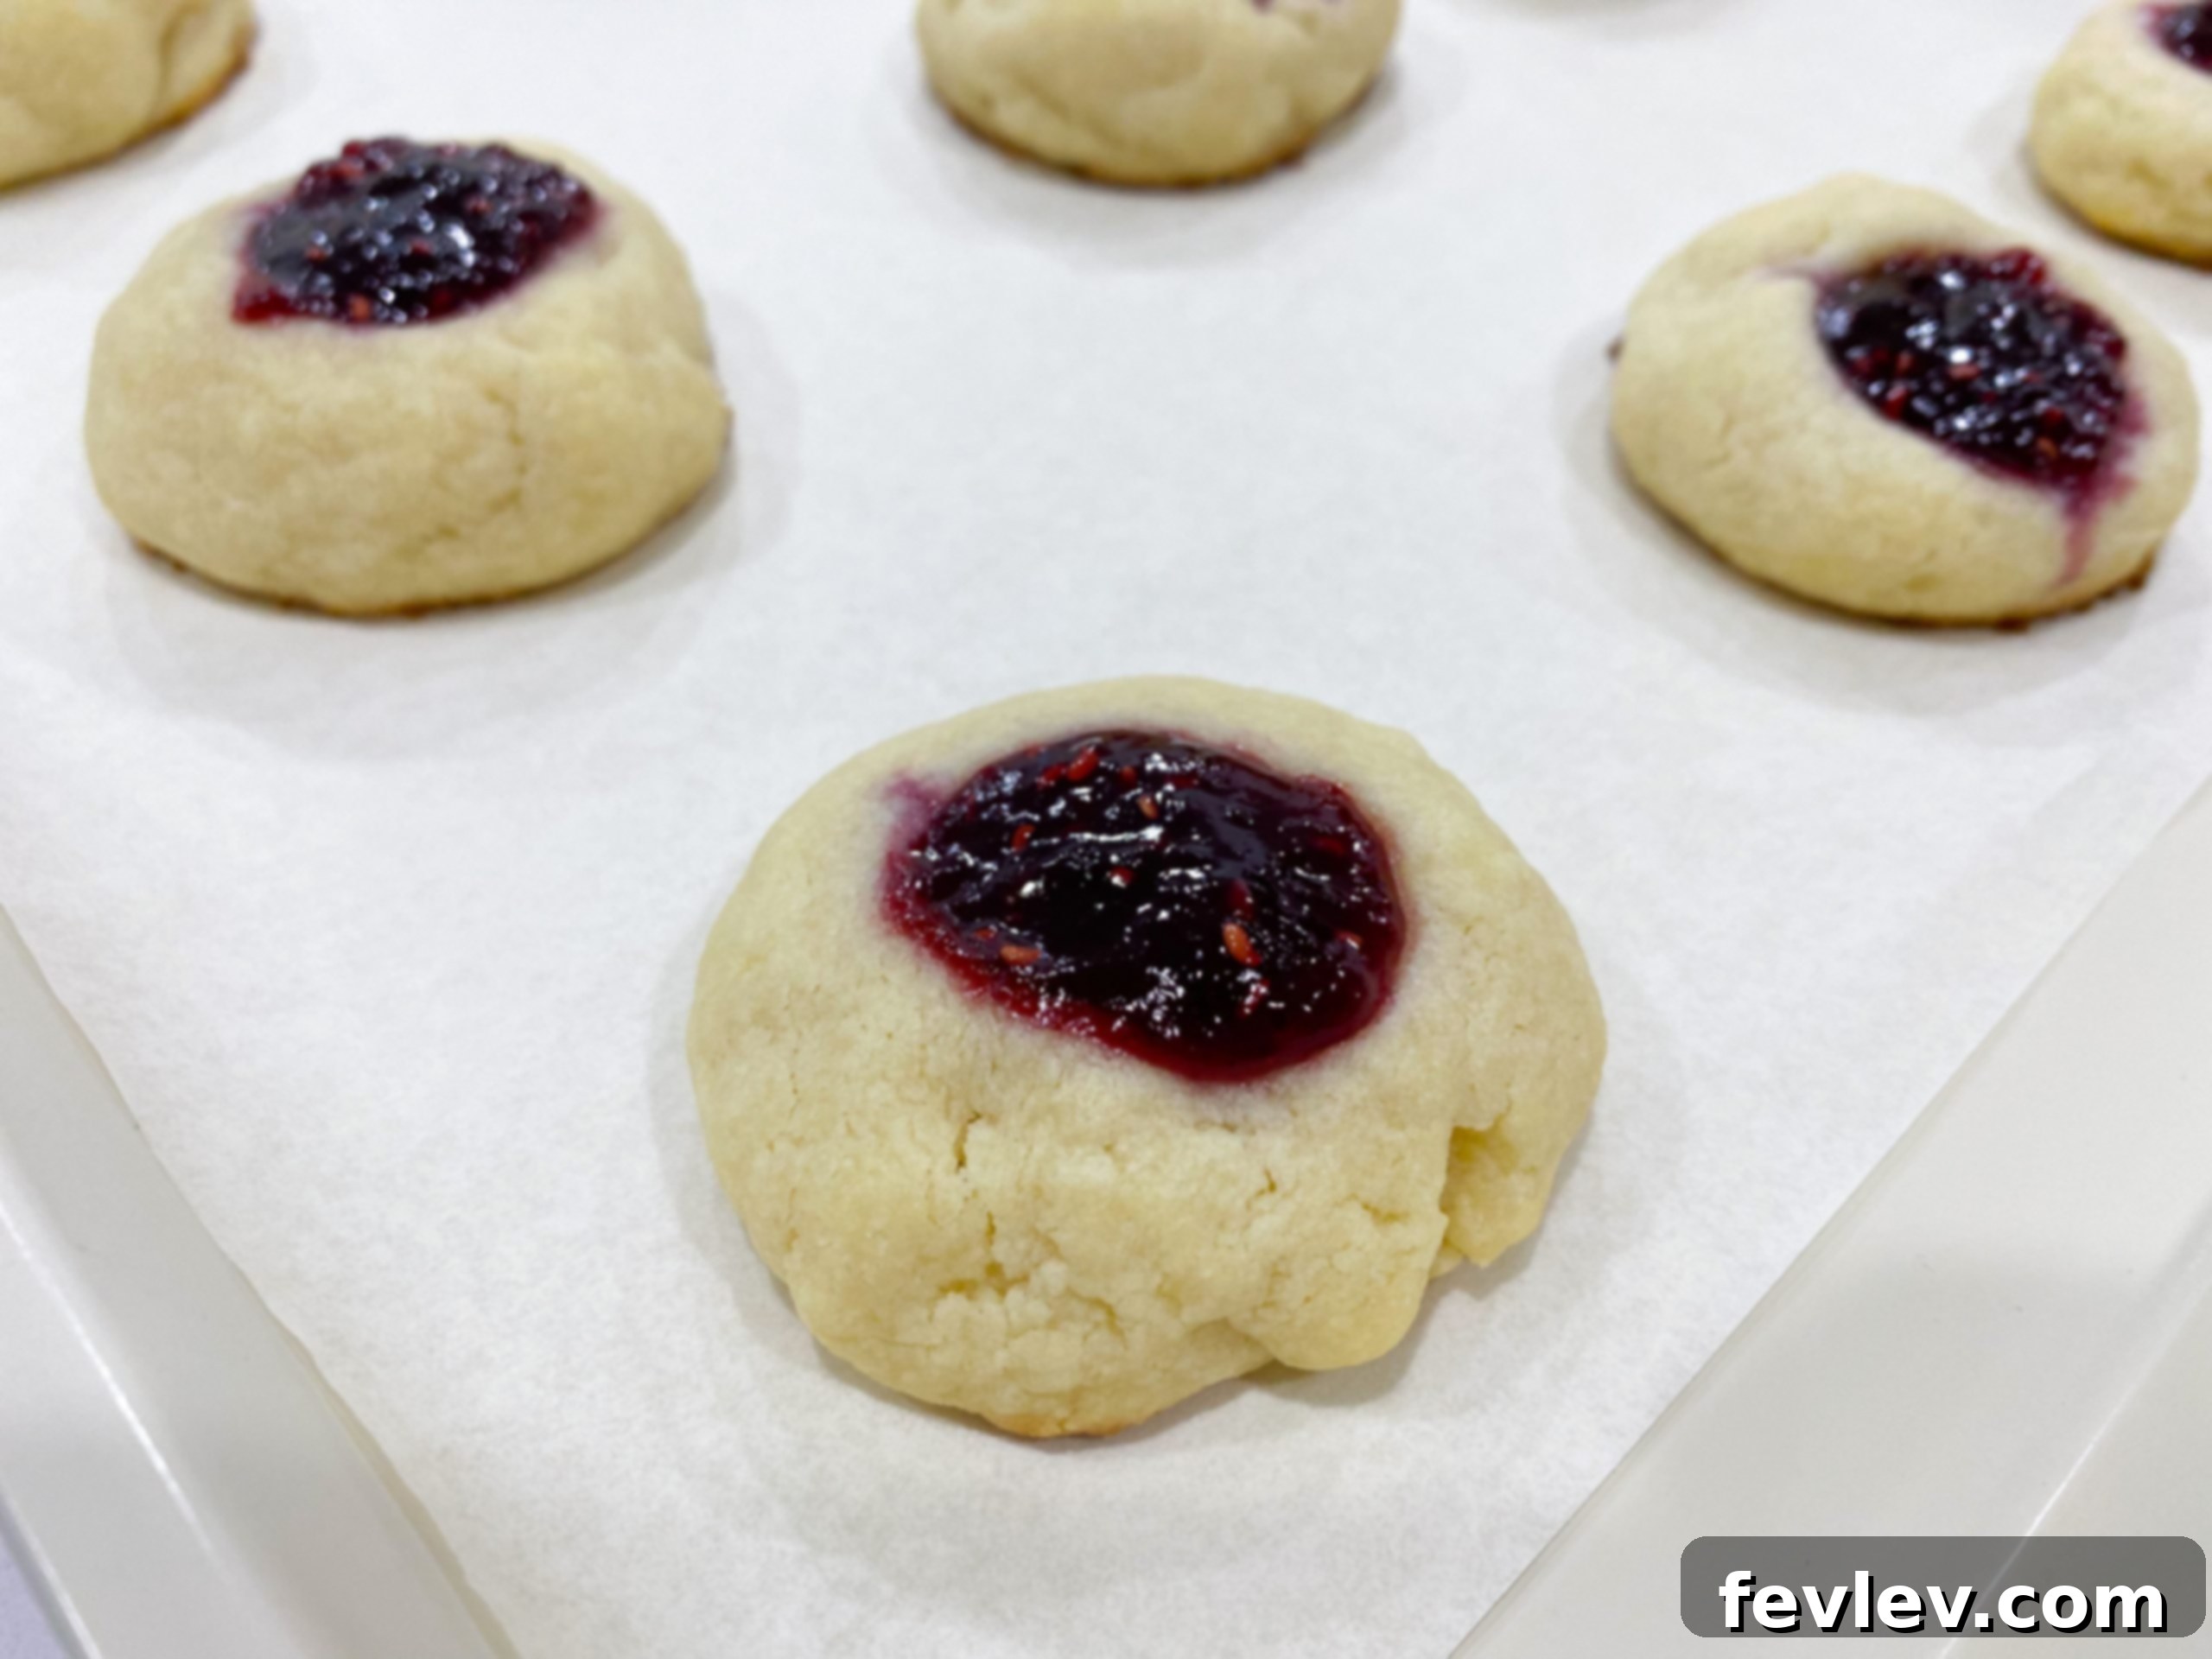
Classic Raspberry Thumbprint Cookies: A Beloved Homemade Treat
Julia Pacheco
Experience the delightful charm of Raspberry Thumbprint Cookies – a classic holiday favorite renowned for its irresistible blend of textures and flavors. These cookies feature a wonderfully buttery and tender shortbread-like base, perfectly complemented by a vibrant, sweet-tart dollop of raspberry jam nestled in the center. Easy to prepare and universally loved, they are the ideal homemade treat to share during festive gatherings, cozy evenings, or simply to satisfy a sweet craving. This recipe ensures a soft, melt-in-your-mouth cookie that will quickly become a cherished addition to your baking traditions.
15 mins
11 mins
26 mins
15 servings
Comment
Print Recipe
Embrace the Sweet Tradition of Homemade Thumbprint Cookies
Few cookies evoke a sense of nostalgia and warmth quite like thumbprint cookies. Their delightful simplicity, combined with the burst of fruity flavor from the jam center, makes them an enduring favorite across generations. These Raspberry Thumbprint Cookies are more than just a delicious dessert; they are a cherished tradition, perfect for holiday cookie exchanges, afternoon tea, or simply enjoying a sweet moment with family and friends.
Our recipe for Raspberry Thumbprint Cookies elevates this beloved classic to new heights. We’ve perfected a buttery, tender dough that practically melts in your mouth, providing the ideal contrast to the bright, tangy sweetness of raspberry preserves. This guide is designed for bakers of all skill levels, ensuring that you can create a batch of these exquisite cookies with confidence and ease. Get ready to fill your home with the inviting aroma of freshly baked goodness!
What Makes These Raspberry Thumbprint Cookies Irresistibly Special?
While many thumbprint cookie recipes exist, ours stands out for several compelling reasons:
- Remarkably Tender Texture: The secret to our cookies’ melt-in-your-mouth quality lies in the harmonious blend of softened butter and cream cheese. This combination yields a uniquely soft and delicate crumb that sets them apart from drier, more crumbly cookie varieties.
- Balanced Flavor Profile: The rich, creamy notes of the cookie dough are perfectly balanced by the vibrant, sweet-tart burst of raspberry jam. This prevents the cookies from being overly sweet, creating an addictive flavor that leaves you wanting another.
- Simple Yet Elegant: Despite their beautiful, professional appearance, these cookies are surprisingly straightforward to make. With minimal steps and common pantry ingredients, you can achieve impressive results without fuss.
- A True Crowd-Pleaser: From holiday celebrations to casual get-togethers, these classic thumbprint cookies are consistently a hit. Their timeless appeal ensures they’ll be devoured by both children and adults.
- Versatile Base Recipe: Beyond raspberry, this dough provides a fantastic foundation for experimentation. Feel free to swap out the jam for other fruit preserves, chocolate, or even caramel, making it adaptable to any taste or occasion.
Prepare to embark on a delightful baking journey that will reward you with truly exceptional cookies!
Don’t Miss Out! Save This Recipe to Your Inbox!
Loved this recipe? Keep it handy for your next baking adventure! Enter your email address below to receive this full recipe directly in your inbox, along with our exclusive weekly newsletter featuring new and exciting culinary creations!
(Please note: This is a static HTML form placeholder. For actual email submission, backend integration is required.)
Ingredients You’ll Need
Crafting perfect Raspberry Thumbprint Cookies begins with quality ingredients. Here’s a concise list of what you’ll need, along with notes on their importance:
- 8 tbs (1 stick) unsalted butter, softened to room temperature
- 4 oz cream cheese, softened to room temperature
- ½ cup granulated sugar
- 1 cup all-purpose flour
- ¼ cup raspberry preserves (high-quality is recommended)
Ingredient Notes for Success:
- Softened Butter and Cream Cheese: This is perhaps the most crucial tip! Ensure both dairy products are truly at room temperature. This allows them to cream together beautifully, incorporating air and creating a homogenous, light base for your dough. Cold ingredients will lead to a lumpy dough and potentially tougher cookies.
- Granulated Sugar: Provides essential sweetness and helps achieve that delightful tender crumb.
- All-Purpose Flour: The structural backbone of the cookie. Accurate measurement is key. While sifting isn’t strictly necessary for this recipe, ensure your flour isn’t packed too tightly when measuring.
- Raspberry Preserves: The heart of these cookies! Opt for a good quality preserve with a rich fruit flavor. If your preserves are particularly chunky, a quick stir or gentle warming can make them easier to spoon into the cookie indentations. Other jam varieties work wonderfully too!
Step-by-Step Baking Instructions
Follow these detailed steps carefully to achieve perfectly baked, tender, and delicious Raspberry Thumbprint Cookies:
-
Cream Butter, Cream Cheese, and Sugar
In a large mixing bowl, or the bowl of a stand mixer fitted with the paddle attachment, combine the softened butter and softened cream cheese. Beat on medium speed for 2 to 3 minutes, or until the mixture is light, creamy, and well combined. This initial creaming process is essential for incorporating air, which contributes to the final cookie’s tender texture. Next, gradually add the granulated sugar, beating until it is fully incorporated and the mixture is fluffy, typically another 1-2 minutes. Remember to scrape down the sides of the bowl periodically to ensure all ingredients are evenly mixed.
Pro Tip: Patience during the creaming stage pays off! A thoroughly creamed base will yield lighter, more delicate cookies.
-
Incorporate Flour and Chill the Dough
Reduce the mixer speed to low and slowly add the all-purpose flour to the wet ingredients. Mix just until the flour is fully incorporated and a soft, cohesive dough forms. Be very careful not to overmix the dough, as excessive mixing can develop the gluten in the flour, resulting in tough or chewy cookies rather than the desired tender texture. Once mixed, cover the bowl tightly with plastic wrap and refrigerate the dough for at least 30 minutes, and ideally up to 1 hour. Chilling is a crucial step that helps firm up the butter, preventing the cookies from spreading too much during baking and ensuring they maintain their shape and tender crumb.
Why Chill? This step is vital for preventing excessive spreading and creating a truly melt-in-your-mouth texture. Don’t skip it!
-
Prepare Your Baking Environment
While the cookie dough is chilling, preheat your oven to 375°F (190°C). Line a large baking sheet with parchment paper. Parchment paper is highly recommended as it prevents the cookies from sticking, ensures even baking, and makes cleanup incredibly easy. Have your raspberry preserves ready and easily accessible for the next step.
-
Form and Shape the Cookies
Remove the chilled dough from the refrigerator. Using a small cookie scoop (approximately 1 tablespoon in size) or your hands, scoop out portions of the dough and roll them into smooth, uniform balls. The consistency of the chilled dough should make this quite manageable. Place the dough balls onto the prepared baking sheet, ensuring they are spaced about 1.5 to 2 inches apart to allow for slight expansion during baking.
Uniformity Matters: For even baking and a beautiful presentation, aim for consistently sized cookie balls. A cookie scoop is your best friend here!
-
Create Thumbprints and Fill with Jam
Gently press an indentation into the center of each cookie dough ball. You can use your thumb, the back of a rounded measuring spoon, or even the blunt end of a wooden spoon. Be careful not to press all the way through to the bottom of the cookie. Into each thumbprint, spoon approximately 1 to 2 teaspoons of raspberry preserves. Avoid overfilling, as the jam may bubble over or spread excessively during baking.
Deep & Distinct: Make sure your indentations are deep enough to hold the jam but not so deep they thin out the cookie base too much.
-
Bake to Golden Perfection
Transfer the baking sheet to the preheated oven. Bake for 11 to 13 minutes, or until the edges of the cookies are lightly golden brown and the centers appear set. The jam will look bubbly and slightly caramelized. Keep a close eye on them during the final minutes of baking, as oven temperatures can vary, and overbaking can lead to dry cookies.
-
Cool and Set
Once baked, carefully remove the cookies from the oven. Allow them to cool on the baking sheet for approximately 5 minutes before gently transferring them to a wire rack to cool completely. This initial cooling period on the warm tray helps the cookies set further, making them less prone to breaking when moved.
-
Serve and Enjoy!
Once completely cooled, your exquisite Raspberry Thumbprint Cookies are ready to be savored! Arrange them on a platter for guests, pack them in a festive tin as a thoughtful gift, or simply enjoy them as a delightful snack with your favorite warm beverage. They are truly a taste of homemade comfort.
Endless Possibilities: Customizing Your Thumbprint Cookies
While the classic raspberry jam version is undeniably delicious, this recipe is incredibly versatile, inviting you to unleash your creativity with various fillings and additions. Here are some delightful variations to explore:
- Alternate Jam Flavors: Experiment with other fruit preserves like apricot, strawberry, blueberry, cherry, or even a tangy lemon curd for a different flavor profile.
- Chocolate Indulgence: For chocolate lovers, fill the indentations with a small amount of melted chocolate (dark, milk, or white) or a spoonful of rich chocolate ganache after the cookies have cooled.
- Nutty Borders: Before making the thumbprint, roll the cookie dough balls in finely chopped nuts such as pecans, walnuts, or almonds for an added layer of texture and a complementary nutty flavor.
- Citrus Zest Boost: Incorporate 1 teaspoon of finely grated lemon or orange zest into the cookie dough along with the sugar. This adds a bright, aromatic lift that pairs beautifully with many fruit fillings.
- Elegant Glaze: Once the cookies are completely cooled, drizzle them with a simple powdered sugar glaze (powdered sugar whisked with a small amount of milk or lemon juice) for extra sweetness and an appealing finish.
- Spiced Delight: Add a pinch of cinnamon or cardamom to the cookie dough for a subtle warmth, especially lovely with apple or plum jams.
- Coconut Dream: For a tropical twist, roll the dough balls in shredded coconut before creating the indentations.
Storage and Freezing Guidelines
To ensure your Raspberry Thumbprint Cookies remain fresh and delicious for as long as possible, follow these practical storage tips:
- Room Temperature: Store baked and completely cooled cookies in an airtight container at room temperature for up to 3-4 days. For optimal freshness, a cool, dry pantry is ideal.
- Refrigeration: If you live in a warm climate or prefer a slightly longer shelf life, you can store the cookies in an airtight container in the refrigerator for up to one week. Allow them to come to room temperature before serving for the best texture and flavor.
- Freezing Baked Cookies: These cookies freeze exceptionally well! Once fully cooled, arrange them in a single layer on a baking sheet and freeze until solid (about 1-2 hours). Then, transfer them to a freezer-safe airtight container or heavy-duty freezer bag, layering with parchment paper to prevent sticking. They can be frozen for up to 3 months. Thaw at room temperature before serving.
- Freezing Unbaked Dough: You can also prepare the dough ahead of time and freeze it. Roll the dough into balls, create the thumbprints, but *do not* add the jam. Freeze the dough balls on a baking sheet until solid, then transfer them to a freezer-safe bag. Freeze for up to 2 months. When ready to bake, place the frozen dough balls on a prepared baking sheet, fill with jam, and bake as directed, adding a few extra minutes to the baking time as needed.
Frequently Asked Questions (FAQ)
- Why are my thumbprint cookies spreading excessively during baking?
- Excessive spreading is a common issue often caused by butter or cream cheese being too warm, or by not chilling the dough sufficiently. Ensure all dairy ingredients are at the correct room temperature (soft but not melted) and that the dough is chilled for the recommended time. An oven that isn’t fully preheated or inaccurate oven temperature can also contribute to spreading. Overmixing the dough can also develop gluten, making it less likely to hold its shape.
- Can I use a different type of jam or filling?
- Absolutely! Raspberry is a beloved classic, but this recipe is incredibly adaptable. Feel free to experiment with strawberry, apricot, blueberry, cherry, or even a citrus curd. For best results, choose a jam or preserve that isn’t too runny, as very liquidy fillings might seep into the cookie dough during baking.
- How can I prevent the jam from burning or becoming too hard?
- Ensuring your oven temperature is accurate and not overfilling the thumbprints are key. If you notice the jam starting to darken too much before the cookies are done, you can loosely tent the baking sheet with aluminum foil for the remaining baking time. Also, high-sugar jams can caramelize quickly, so monitor closely.
- My cookies turned out crumbly or tough. What went wrong?
- Crumbly cookies usually indicate too much flour or insufficient moisture. Make sure to measure your flour accurately, ideally using a kitchen scale for precision. Tough cookies often result from overmixing the dough, which develops gluten. Mix only until the flour is just combined.
- Is it possible to make these cookies ahead of time?
- Yes, these cookies are perfect for preparing in advance! The dough can be made and chilled in the refrigerator for up to 2-3 days before baking. Baked cookies also store well at room temperature for a few days or can be frozen for several months, making them an ideal treat for busy periods or gifting.
- What’s the best way to create uniform cookie indentations?
- While your thumb works perfectly, for more consistent and neat indentations, consider using the back of a rounded measuring spoon (like a half-teaspoon) or the blunt end of a wooden spoon. This helps ensure each cookie has a well-defined pocket for the jam.
- Can I add flavorings to the cookie dough?
- Certainly! A dash of pure vanilla extract (1/2 teaspoon) can be added with the wet ingredients for extra depth. You could also include a pinch of almond extract or citrus zest (lemon or orange) to complement the fruit jam.
Nutrition Information
Approximate Nutritional Values Per Serving (1 of 15 cookies):
- Calories: 152 kcal
- Carbohydrates: 17g
- Protein: 1g
- Fat: 9g
- Saturated Fat: 5g
- Polyunsaturated Fat: 0.4g
- Monounsaturated Fat: 2g
- Trans Fat: 0.2g
- Cholesterol: 24mg
- Sodium: 74mg
- Potassium: 25mg
- Fiber: 0.3g
- Sugar: 10g
- Vitamin A: 288 IU
- Vitamin C: 0.5mg
- Calcium: 12mg
- Iron: 0.4mg
Please note: Nutrition information is automatically calculated and should be considered an approximation. Actual values may vary based on specific brands of ingredients used and exact preparation methods.
Tried this delightful recipe?
Let us know how your Raspberry Thumbprint Cookies turned out!