
Homemade Cherry Danish: An Easy & Delicious Recipe
By: Julia Pacheco
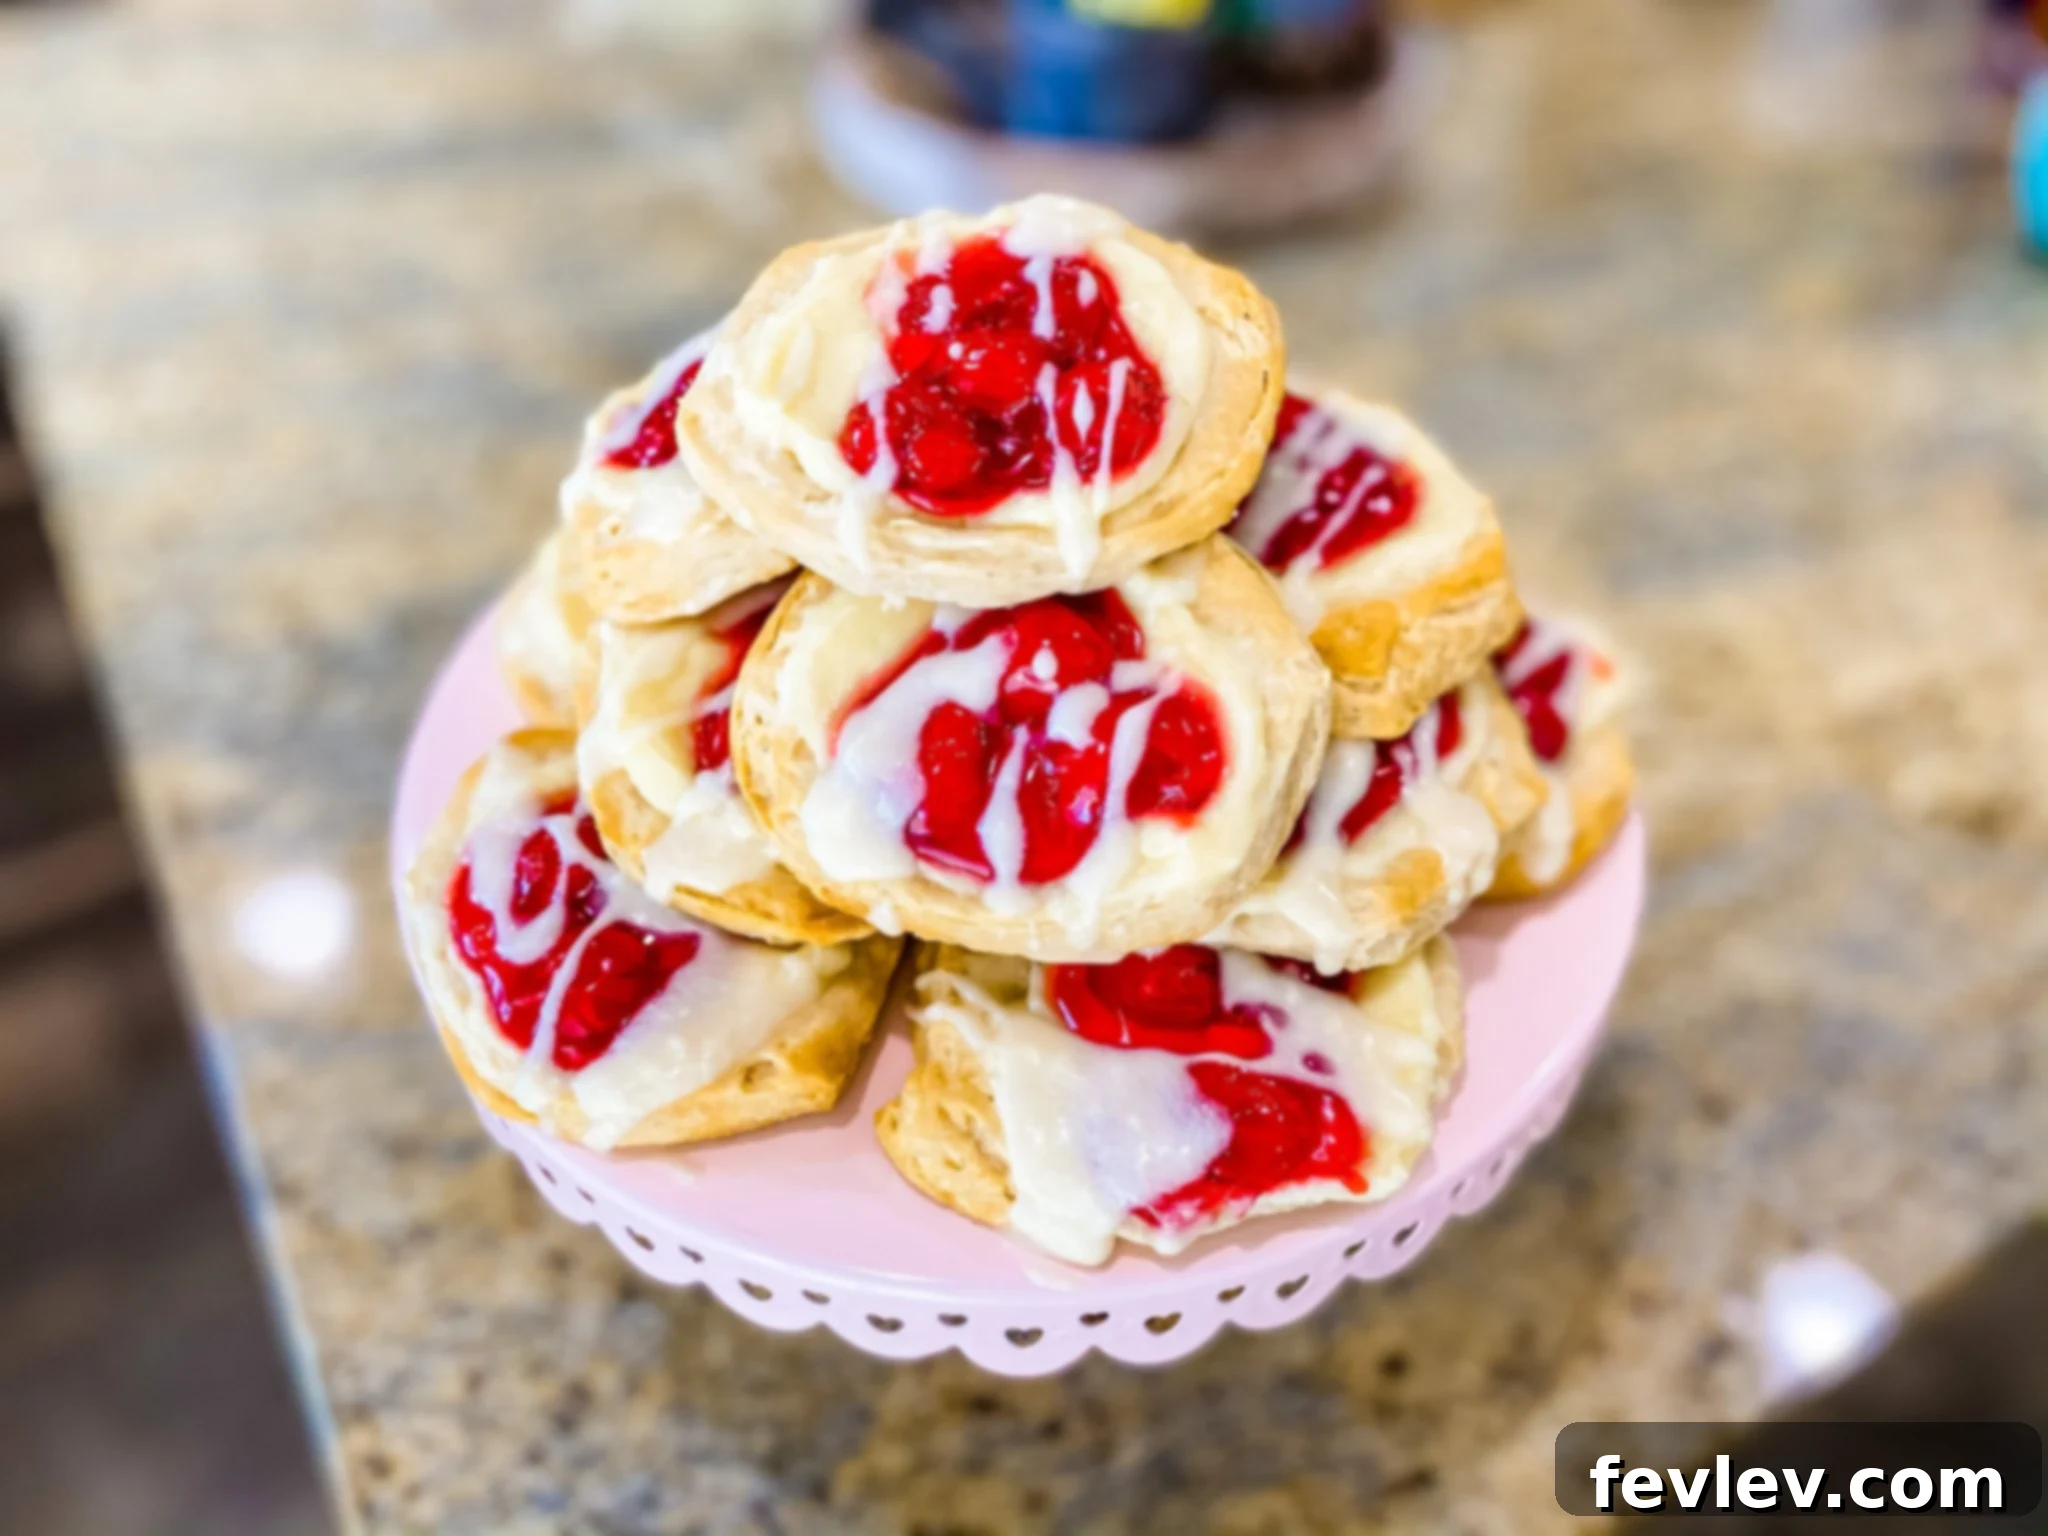
Indulge in the simple pleasure of a homemade Cherry Danish. This recipe transforms ordinary ingredients into an extraordinary pastry, perfect for any occasion. Featuring a flaky, golden crust, a rich and creamy sweet cheese filling, and bursting with vibrant cherry flavor, each danish is crowned with a delicate vanilla glaze. Whether it’s a special weekend brunch, a delightful breakfast treat, or an elegant dessert, these bakery-worthy danishes are surprisingly simple to make right in your own kitchen. Prepare to impress with minimal effort and maximum deliciousness!
10 mins
20 mins
30 mins
8 servings
Pin Recipe
Print Recipe
Discover the Delight of Homemade Cherry Danishes
There’s something uniquely satisfying about biting into a warm, freshly baked pastry, especially when it’s made with love in your own home. Our homemade cherry danish recipe captures that bakery-quality experience without the usual complexities. This recipe is designed for ease and accessibility, allowing even novice bakers to create stunning results. By leveraging a clever shortcut with store-bought biscuit dough, we bypass the lengthy process of preparing traditional laminated pastry, making these delightful treats achievable in just 30 minutes!
The magic of these danishes lies in the harmonious blend of flavors and textures. The base provides a wonderfully flaky and slightly crisp foundation, while the creamy filling, made with softened cream cheese, granulated sugar, and a hint of vanilla, offers a smooth and rich counterpoint. Nestled atop this creamy layer are luscious cherries from a readily available pie filling, providing a burst of fruity sweetness and a beautiful crimson hue. Finally, a simple vanilla glaze drizzled over the top adds a glistening finish and an extra layer of sweetness, elevating these danishes from a simple snack to a truly special indulgence. Perfect for a leisurely breakfast, an elegant brunch, or even an afternoon pick-me-up, these cherry danishes are sure to become a cherished favorite.
Essential Ingredients for Your Cherry Danishes
Crafting these delectable cherry danishes requires only a few key ingredients, most of which you likely already have in your pantry or can easily find at any grocery store. The beauty of this recipe lies in its simplicity and the intelligent use of convenient components that deliver maximum flavor and texture with minimal fuss. Here’s a detailed breakdown of what you’ll need, along with insights into choosing the best options for stellar results:
For the Flaky Danish Pastries:
- 1 package Pillsbury biscuit dough: This is the cornerstone of our easy danish recipe. For best results and a more substantial danish, opt for the larger “Grands!” style biscuits. Regular-sized biscuits will also work if you prefer smaller, more delicate pastries. Ensure the dough is kept refrigerated until you’re ready to use it, maintaining its flaky integrity. This ingenious shortcut saves hours of prep time compared to traditional laminated doughs.
- ¼ cup granulated sugar: Essential for sweetening the luscious cream cheese filling. This amount provides a balanced sweetness that complements both the cream cheese and the tartness of the cherries. Feel free to adjust slightly to suit your personal preference for sweetness.
- 8 oz softened cream cheese: For the creamiest and most luxurious filling, full-fat cream cheese is highly recommended. It provides a rich texture and flavor that is hard to beat. It’s crucial that the cream cheese is at room temperature before mixing; this ensures a smooth, lump-free consistency that blends effortlessly with the other ingredients. Avoid low-fat or whipped varieties, as they can alter the filling’s texture and overall richness.
- 1 tsp vanilla extract: A touch of pure vanilla extract enhances the overall sweetness of the cream cheese filling and adds a warm, aromatic depth that marries beautifully with the cherries. Using a high-quality vanilla extract can make a noticeable difference in the final flavor profile.
- 21 oz cherry pie filling: This convenient canned filling makes preparing the fruit component a breeze. You can find varieties with whole or sliced cherries, depending on your textural preference. If you’re feeling ambitious or have fresh cherries on hand, a homemade cherry filling can also be used, adding another layer of bespoke deliciousness.
- ¼ cup powdered sugar: This ingredient is an optional but highly recommended garnish. A light dusting over the finished danishes adds an extra delicate touch of sweetness and a visually appealing, professional finish.
For the Elegant Sweet Glaze:
The simple vanilla glaze is the crowning glory of these danishes, providing a beautiful sheen and a final layer of sweetness that perfectly complements the rich cream cheese and juicy cherries. It’s incredibly easy to whisk together while your danishes are cooling.
- ¾ cup powdered sugar: The essential base for our glaze. If you desire an ultra-smooth glaze, sifting the powdered sugar beforehand will help prevent any lumps.
- 1 tbs softened butter: Incorporating softened butter into the glaze adds a lovely richness and helps the glaze set with a slight firmness, preventing it from being too runny. Just like the cream cheese, ensuring the butter is at room temperature will allow it to blend seamlessly.
- 1 tsp vanilla extract: Continues the vanilla theme, deepening the flavor of the glaze and tying all the components of the danish together harmoniously.
- 2 tbs milk: Used to achieve the ideal pourable consistency for your glaze. Start with two tablespoons and add more in small increments if needed, or a tiny bit more powdered sugar if it becomes too thin. Any type of milk—dairy or non-dairy—will work perfectly here.
Effortless Baking: Your Guide to Perfect Cherry Danishes
Creating these golden, flaky, and irresistibly delicious cherry danishes is a straightforward process designed for home bakers. Follow these detailed instructions, and you’ll be enjoying your homemade pastries in no time!
-
Preheat Your Oven: Begin by preheating your oven to 350 degrees Fahrenheit (175 degrees Celsius). This crucial first step ensures that your oven is at the perfect temperature for even baking and a beautiful golden-brown finish once your danishes are ready to go in. While the oven warms up, you can prepare the delicious cream cheese filling.
-
Prepare the Cream Cheese Filling: In a medium mixing bowl, combine the softened cream cheese, granulated sugar, and vanilla extract. Using an electric mixer on medium speed, or a sturdy spatula and some elbow grease, beat these ingredients together until the mixture is completely smooth, light, and wonderfully creamy. Make sure there are no lumps of cream cheese remaining, as a smooth filling is key to a perfect danish.
-
Separate the Biscuit Dough: Carefully open the package of Pillsbury biscuit dough. Separate each biscuit into individual rounds. Now, gently peel each biscuit horizontally into two thinner halves. This technique will yield 16 thinner biscuit rounds from an 8-count package, creating the ideal base for your danishes. Handle the dough gently to preserve its natural layers, which contribute to the flaky texture.
-
Arrange on Baking Sheet: Line a large baking sheet with parchment paper. This step is essential for preventing sticking and ensures easy cleanup. Carefully arrange the 16 biscuit halves onto the prepared baking sheet, leaving adequate space between each one to allow for expansion during baking. Overcrowding the sheet can lead to uneven baking.
-
Create Wells for Filling: To form the perfect indentation for your filling, take a ¼ cup measuring cup and gently but firmly press down on the center of each biscuit half. This action creates a shallow well in the middle of the dough, which will cradle the cream cheese and cherry filling. Be careful not to press all the way through the dough, keeping the sides intact to hold the filling.
-
Fill the Danishes: Now comes the flavorful part! Spoon approximately 1 tablespoon of your prepared cream cheese mixture into the well of each biscuit. Follow this by carefully placing about 3-4 cherries from the cherry pie filling on top of the cream cheese. Distribute the filling evenly among all the danishes, being mindful not to overfill them, which could cause the filling to bubble over during baking.
-
Bake to Golden Perfection: Place the baking sheet with your beautifully filled danishes into the preheated oven. Bake for 12 to 18 minutes. Baking times can vary slightly depending on your oven, so keep a close watch. The danishes are perfectly baked when their edges turn a beautiful golden brown and the pastry appears puffed and flaky. Once baked, remove them from the oven and let them cool on the baking sheet for a few minutes before transferring them to a wire rack to cool completely.
-
Prepare the Sweet Glaze: While the danishes are cooling, whisk together the ¾ cup of powdered sugar, 1 tablespoon of softened butter, 1 teaspoon of vanilla extract, and 2 tablespoons of milk in a small bowl. Continue whisking until the glaze is smooth, free of lumps, and has a pourable but not watery consistency. If it’s too thick, add a tiny bit more milk (a teaspoon at a time); if too thin, stir in a little more powdered sugar until it reaches your desired consistency.
-
Garnish and Serve: Ensure the baked danishes have cooled sufficiently, preferably to room temperature or at least warm to the touch. Once cooled, artfully drizzle the prepared vanilla glaze over the top of each cherry danish. For an extra touch of sweetness and a truly professional presentation, you can lightly sprinkle additional powdered sugar over the glazed danishes. Serve immediately and savor every delicious bite of your homemade bakery-worthy treats!
Pro Tips for Bakery-Perfect Cherry Danishes
Achieving outstanding results with these easy cherry danishes is simple, but a few expert tips can elevate your baking even further. Here’s how to ensure every batch is a resounding success:
- Gentle Dough Handling: When separating and flattening the biscuit dough, use a light touch. Overworking the dough can develop gluten, leading to a tougher pastry rather than the desired light and flaky texture.
- Room Temperature Matters: Always ensure your cream cheese and butter are at proper room temperature. This is vital for achieving a smooth, lump-free cream cheese filling and a consistent, easy-to-mix glaze.
- Parchment Paper is Non-Negotiable: Do not skip lining your baking sheet with parchment paper. It’s an invaluable tool for preventing sticking, promoting even browning, and making cleanup incredibly simple.
- Monitor Baking Closely: Oven temperatures can vary. Keep a close eye on your danishes, particularly during the last few minutes of baking. Look for distinctly golden-brown edges as the indicator of perfect doneness.
- Glaze Consistency is Key: When mixing your glaze, add milk slowly, a teaspoon at a time, until you reach a consistency that drizzles beautifully but isn’t too thin. A glaze that’s too runny will simply slide off the danish, while one too thick will be clumpy.
- Cool Before Glazing: Patience is a virtue in baking. Resist the urge to glaze hot danishes, as the heat will melt the glaze, causing it to run off and create a messy finish. Allow them to cool sufficiently for the glaze to set perfectly.
- Quality Ingredients: While this recipe uses convenient items, choosing good quality brands for your biscuit dough, cream cheese, and cherry filling can subtly enhance the overall taste of your danishes.
Creative Variations & Serving Inspirations
While the classic cherry danish is a beloved treat, this versatile recipe lends itself beautifully to experimentation. Don’t hesitate to personalize your pastries!
Creative Filling Variations:
- Mixed Berry Delight: Swap out the cherry pie filling for blueberry, raspberry, or a mixed berry pie filling for a different vibrant fruit flavor.
- Apple Cinnamon Comfort: For a cozy, autumnal twist, use apple pie filling and add a pinch of ground cinnamon to your cream cheese mixture.
- Zesty Lemon Kick: Incorporate a teaspoon of fresh lemon zest into the cream cheese filling to add a bright, refreshing, and tangy counterpoint to the sweetness.
- Nutty Crunch: Before baking, sprinkle a small amount of finely chopped pecans or walnuts over the fruit filling for an added layer of texture and a subtle nutty flavor.
- Chocolate Indulgence: For a more decadent dessert danish, drizzle melted dark or milk chocolate over the cooled pastries, either in addition to or instead of the vanilla glaze.
Perfect Serving Ideas:
- Breakfast Brilliance: Serve these warm danishes with a freshly brewed cup of coffee, a creamy latte, or a soothing herbal tea for a truly delightful start to your day.
- Brunch Showstopper: These danishes make a fantastic centerpiece for any brunch spread, beautifully complementing savory dishes like quiches or scrambled eggs, and other fresh fruits.
- Afternoon Indulgence: Enjoy a danish as a sophisticated afternoon snack or a sweet treat to accompany your coffee break.
- Thoughtful Gift: Package a selection of your homemade danishes in an elegant box or cellophane bag tied with a ribbon for a thoughtful and delicious gift for friends, family, or neighbors.
Storing Your Homemade Cherry Danishes for Freshness
To ensure your delicious cherry danishes remain fresh and flavorful for as long as possible, follow these simple storage recommendations:
- Room Temperature: If you plan to enjoy your danishes within 1-2 days, they can be stored in an airtight container at room temperature. This helps maintain their soft texture and prevents them from drying out.
- Refrigeration: For extended freshness, or if you live in a warm climate, it’s best to refrigerate the danishes in an airtight container for up to 3-4 days. Before serving, allow them to come to room temperature or gently warm them in a low oven for a few minutes to restore their fresh-baked taste and texture.
- Freezing: You can freeze either unbaked or baked danishes. For unbaked: assemble them up to step 6 (filling stage), then freeze them on a baking sheet until solid. Once frozen, transfer them to a freezer-safe bag or container. Bake directly from frozen, adding an extra 5-10 minutes to the baking time. Baked danishes can also be frozen; simply thaw them at room temperature and gently reheat for a fresh-from-the-oven experience.
Watch the Cherry Danish Recipe Video
For a visual guide to crafting these delicious treats, watch Julia Pacheco demonstrate innovative ways to use canned biscuit dough. The specific instructions for these Cherry Danishes begin around the 4:12 mark in the video tutorial.
Nutrition Information Per Serving
Calories: 496kcal
Carbohydrates: 72g
Protein: 6g
Fat: 21g
Saturated Fat: 8g
Polyunsaturated Fat: 4g
Monounsaturated Fat: 7g
Trans Fat: 0.1g
Cholesterol: 33mg
Sodium: 660mg
Potassium: 253mg
Fiber: 1g
Sugar: 24g
Vitamin A: 584IU
Vitamin C: 3mg
Calcium: 69mg
Iron: 2mg
Please note: Nutrition information provided is an estimation. Values can vary based on specific brands of ingredients, exact measurements, and preparation methods. It should be used as an approximation only.
Tried this delicious recipe?
Let us know how it was by sharing your experience below! We cherish your feedback and tips.
Share Your Experience and Thoughts!
We absolutely love hearing from our community of home bakers. If you’ve tried this easy homemade Cherry Danish recipe, please share your thoughts! How did they turn out? Did you experiment with any of our suggested variations, or perhaps invent one of your own? What did your family and friends think of these delightful pastries?
Your feedback is invaluable and helps other bakers. Feel free to leave your comments, questions, and any tips you discovered along the way in the section below. Happy baking!