
Jump to Recipe
Product links may contain affiliate links. As an Amazon Associate, I earn from qualifying purchases.
Decadent Hot Cocoa Cookies: Your Ultimate Winter Baking Delight
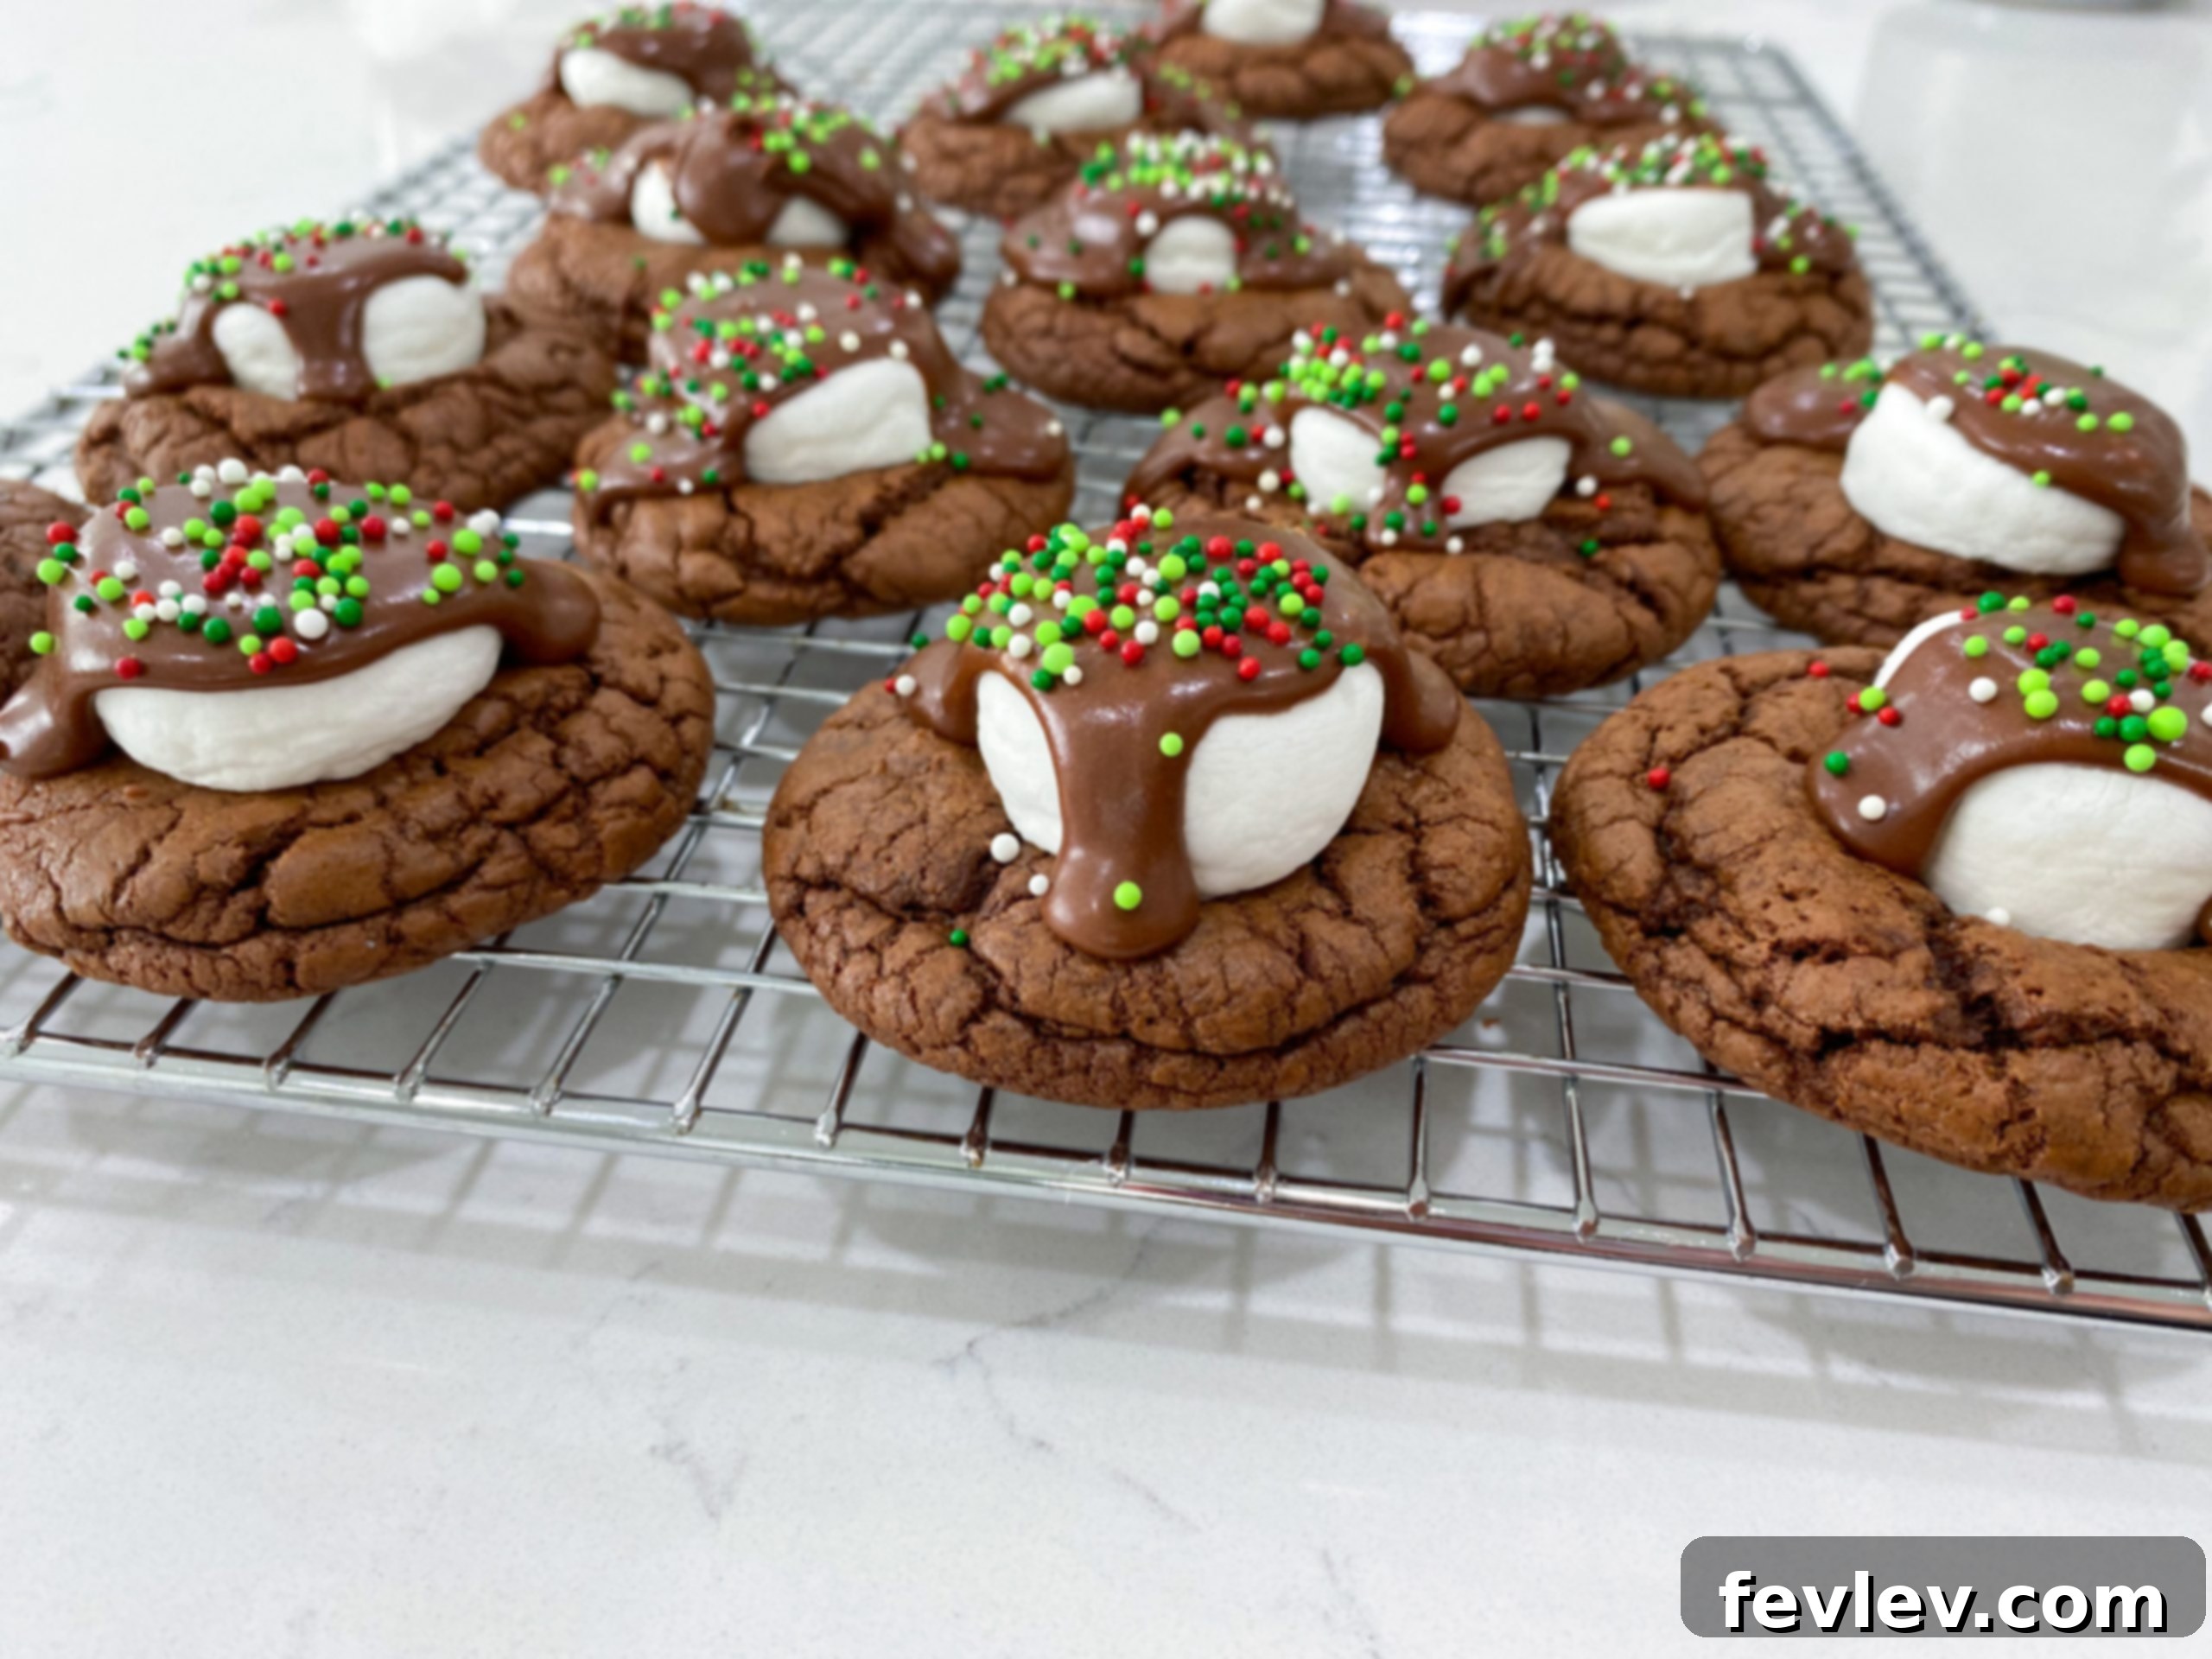
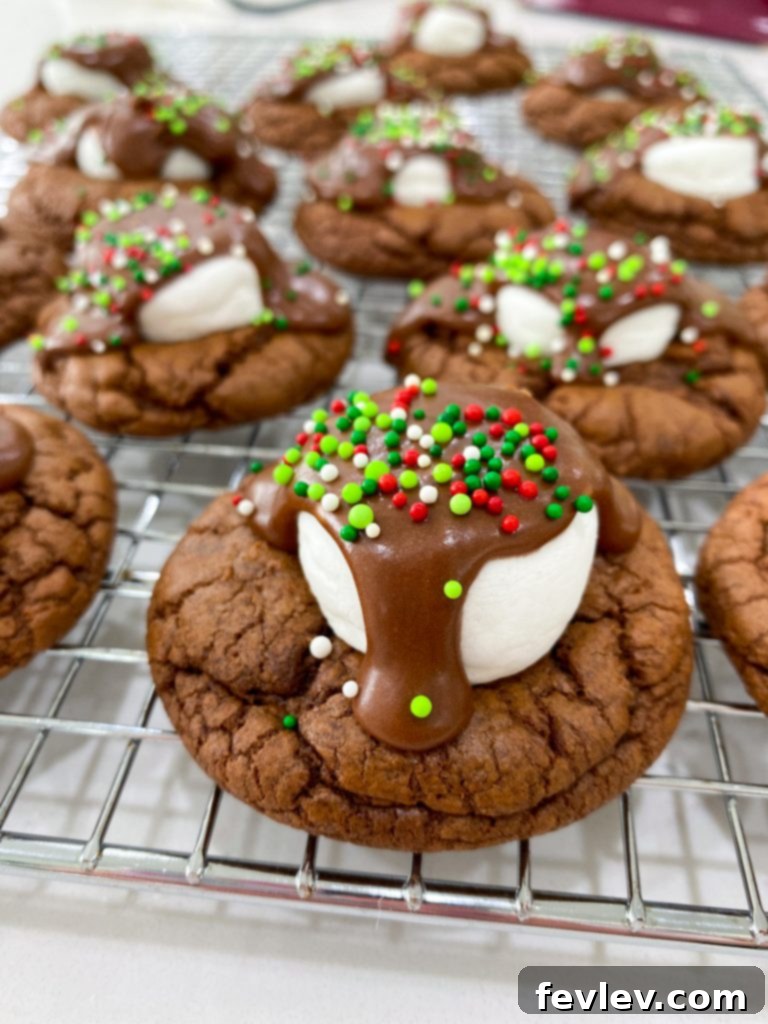
Imagine the comforting warmth of a steaming mug of hot cocoa on a chilly evening. Now, picture that delightful flavor infused into an irresistible cookie! These Hot Cocoa Cookies are a magnificent creation, blending the rich, deep taste of chocolate with the sweet, gooey indulgence of melted marshmallows, all crowned with a luscious hot chocolate glaze and a sprinkle of festive cheer. This recipe is destined to become a beloved staple in your holiday baking repertoire, quite possibly becoming Santa’s new favorite treat!
Whether you’re hosting a holiday party, seeking a cozy dessert for a family night, or looking for the perfect homemade gift, these cookies are truly showstoppers. Their elaborate appearance might suggest a complicated process, but they are surprisingly straightforward to make, welcoming bakers of all skill levels. The base is a fudgy chocolate cookie, reminiscent of a decadent brownie, which perfectly complements the airy texture of toasted marshmallows and the silky-smooth cocoa glaze. Prepare to fill your home with wonderful aromas and your plates with pure, unadulterated joy.
Essential Ingredients for Your Hot Cocoa Cookie Masterpiece
One of the many charms of this spectacular Hot Cocoa Cookie recipe is that it primarily uses common pantry staples. The cookie dough itself is so divinely chocolatey, tasting remarkably like fresh brownie batter, that we won’t judge if you find yourself sneaking a spoonful before it even hits the oven! Using quality ingredients will undoubtedly enhance the final flavor, ensuring every bite delivers a harmonious blend of rich chocolate and marshmallow magic.
To bring these magnificent hot chocolate marshmallow cookies to life, gather the following:
- Butter: Opt for unsalted and softened butter. This is crucial for creaming properly, forming the rich foundation of both the cookie dough and the luxurious glaze.
- Semi-sweet Chocolate Chips: These are the core of our chocolate flavor. High-quality chips will melt smoothly and contribute a deep, satisfying sweetness to the cookies.
- All-Purpose Flour: The essential structural component. Accurate measurement is key to achieving the perfect soft and chewy texture; avoid packing it into the measuring cup.
- Salt: A vital ingredient that balances the sweetness, enhances the chocolate notes, and rounds out the overall flavor profile.
- Unsweetened Cocoa Powder: Provides the intense chocolate flavor and beautiful dark color for both the cookie and the glaze. Dutch-processed cocoa is often preferred for a richer, less acidic taste.
- Baking Powder: Our leavening agent, ensuring the cookies rise beautifully and have a tender, slightly chewy crumb.
- Brown Sugar: Delivers moisture, contributing significantly to the wonderfully chewy texture, and imparts a subtle, warm caramel undertone.
- Vanilla Extract: A flavor enhancer that brings depth and complexity to all the other ingredients. Always use pure vanilla extract for the best results.
- Eggs: Act as binders, adding structure, moisture, and contributing to the rich, fudgy consistency of the cookie dough.
- Large Marshmallows: Absolutely essential for that iconic, wonderfully melty topping. Make sure to choose the large size, as they maintain their shape better during baking and create a more impressive, gooey layer compared to mini marshmallows.
For the Irresistible Hot Cocoa Glaze:
- Powdered Sugar: The fine texture of powdered sugar creates a silky-smooth, pourable glaze. Sifting is recommended to prevent lumps.
- Melted Butter: Adds richness and helps achieve the desired creamy consistency for the glaze.
- Unsweetened Cocoa Powder: For a concentrated chocolate essence in the glaze, ensuring a balanced hot cocoa flavor.
- Hot Water: Used to adjust the glaze’s thickness. Add gradually to achieve a perfect drizzling consistency.
- Vanilla Extract: To complement and enhance the rich chocolate flavors in the glaze.
- Festive Sprinkles: For a burst of color and a celebratory touch, making these cookies truly eye-catching.
Crafting Your Perfect Hot Cocoa Cookies: A Detailed Guide
While these Hot Cocoa Cookies might look like a gourmet confectionery creation, the process of making them is surprisingly simple, broken down into a few distinct and manageable steps. By following these instructions carefully, you’ll be rewarded with a batch of cookies that are as visually stunning as they are irresistibly delicious.
Step 1: Preparing the Decadent Cookie Dough
The journey to these delightful chocolate marshmallow cookies begins with creating a rich, flavorful dough that could almost be eaten with a spoon – it tastes remarkably similar to homemade brownie batter!
- In a microwave-safe bowl, combine the ½ cup softened butter and 12 ounces of semi-sweet chocolate chips. Heat the mixture in short intervals, typically 30 seconds at a time, stirring thoroughly after each heating session. Continue until both the butter and chocolate chips are fully melted and smoothly combined into a glossy chocolate sauce. Set this luxurious chocolate mixture aside to cool slightly.
- In a separate, medium-sized bowl, whisk together all your dry ingredients: 1 ½ cups of all-purpose flour, a pinch of salt, ¼ cup of unsweetened cocoa powder, and 1 ½ teaspoons of baking powder. Whisking ensures that the leavening agent is evenly distributed and prevents any unwelcome clumps in your final dough.
- Now, in the bowl of a stand mixer (I find my Kitchenaid stand mixer to be an indispensable tool, especially when paired with a reliable cookie paddle attachment for perfectly uniform mixing!), add the 1 ¼ cups of brown sugar, 1 teaspoon of vanilla extract, and 3 eggs. Beat these ingredients together until they are light, fluffy, and well combined.
- Carefully pour the cooled chocolate-butter mixture (from step 1) into the stand mixer bowl with the wet ingredients. Mix until everything is fully incorporated and the mixture is uniformly chocolatey. Don’t forget to scrape down the sides of the bowl to ensure all ingredients are mixed.
- Gradually add the whisked dry ingredients to the chocolate mixture, mixing on low speed just until no streaks of flour are visible. It’s important not to overmix at this stage, as excessive mixing can develop the gluten in the flour, leading to tougher cookies.
- Cover the bowl tightly with plastic wrap or a lid and refrigerate the cookie dough for at least one to two hours. This step is absolutely crucial! Chilling the dough solidifies the butter, which significantly helps in preventing the cookies from spreading too much in the oven, ensuring they maintain a beautiful, thick, and wonderfully chewy texture. Nobody wants thin, flat cookies!
Step 2: Baking to Perfection with Gooey Marshmallows
The baking process for these unique cookies involves a two-stage approach to achieve crispy edges, a soft center, and that signature, beautifully melted marshmallow topping.
- Preheat your oven to 325°F (160°C). Prepare your baking sheets by lining them with parchment paper. This not only prevents sticking but also makes for incredibly easy cleanup.
- Using a cookie scoop, portion out the chilled cookie dough into uniform balls, each roughly 1.5 to 2 tablespoons in size. Gently roll them between your palms to create smooth, neat spheres. Place these dough balls on the prepared baking sheets, ensuring they are spaced approximately 2 inches apart. This spacing allows the cookies to spread adequately without merging during baking. Given that this recipe yields about 24 cookies, you will likely need to bake them in batches, utilizing multiple baking sheets.
- Bake the cookies for 11 to 12 minutes. At this point, the edges should appear set and lightly golden, but the centers will still look soft and slightly underdone.
- While the cookies are undergoing their initial bake, retrieve your large marshmallows and, using kitchen shears or a sharp knife, carefully cut each marshmallow in half horizontally. This ensures a perfectly sized, soft, and melty topping for each cookie.
- Once the initial baking time is complete, carefully remove the baking sheets from the oven. Working quickly, place one marshmallow half onto the center of each warm, partially baked cookie.
- Return the baking sheets to the oven for an additional two minutes. It’s important to stay vigilant during this brief second bake! The objective is for the marshmallows to become wonderfully melty, puffed, and slightly golden brown, but still retain some of their shape rather than dissolving into a complete liquid puddle.
- Remove the cookies from the oven and allow them to cool on the baking sheets for about two minutes. This brief resting period helps them firm up slightly before you carefully transfer them to a wire rack to cool completely. Ensuring the cookies are fully cooled before glazing is paramount to prevent the glaze from simply running off.
Step 3: Drizzling with Hot Cocoa Glaze and Festive Sprinkles
The grand finale that transforms these treats into truly authentic Hot Cocoa Cookies is the application of a rich, glossy glaze and a generous shower of festive sprinkles.
- To prepare the show-stopping hot cocoa glaze, combine all the glaze ingredients – 2 cups of powdered sugar, 4 tablespoons of melted butter, ¼ cup of unsweetened cocoa powder, ¼ cup of hot water, and ½ teaspoon of vanilla extract – in a medium bowl. Whisk vigorously until the mixture is completely smooth and free of any lumps. The ideal consistency for the glaze is one that is thick enough to coat the back of a spoon but still thin enough to drizzle beautifully. If your glaze appears too thick, gradually add more hot water, one teaspoon at a time, whisking thoroughly after each addition until the desired consistency is achieved. Conversely, if it’s too thin, a little more sifted powdered sugar can help thicken it.
- Once your cookies have cooled down completely, it’s time for the delightful task of decorating! Generously drizzle the hot cocoa glaze over the top of each cookie. Don’t be concerned if some of the glaze gracefully drips down the sides – this only enhances their homemade, rustic charm.
- Immediately after drizzling the glaze, while it is still wet and pliable, generously sprinkle your favorite festive Christmas sprinkles over the top of each cookie. This step not only adds a beautiful pop of color but also infuses a fun, celebratory spirit into every bite.
- Allow the cookies to sit undisturbed for approximately 20 minutes, or longer if necessary, to give the glaze sufficient time to set. This ensures the glaze is no longer sticky and adheres perfectly to the cookie, making them easier to handle and enjoy.
Pro Tips and Creative Variations for Your Hot Cocoa Cookies
Achieving bakery-quality Hot Cocoa Cookies is much simpler with a few expert insights and techniques. Furthermore, this versatile recipe offers endless opportunities for customization, allowing you to tailor these treats to your unique preferences or the occasion.
Tips for Achieving Cookie Perfection:
- Accurate Flour Measurement: To avoid dry or dense cookies, measure your flour correctly. Spoon the flour into your measuring cup and then level it off with the back of a knife or a straight edge. Never scoop directly from the bag, as this compacts the flour, leading to an over-measurement.
- The Importance of Chill Time: Do not skip the refrigeration step for the dough! This crucial period allows the butter to firm up, which is essential for preventing the cookies from spreading excessively in the oven. Chilling ensures your cookies remain thick, deliciously chewy, and perfectly formed. It also helps to deepen the flavors.
- Room Temperature Ingredients: Always ensure your butter and eggs are at room temperature. This allows them to cream together more effectively, creating a smoother, more emulsified dough that will result in a better texture for your baked cookies.
- Precise Marshmallow Placement: For the most appealing presentation and optimal melt, gently press each marshmallow half into the center of the cookie immediately after the initial bake. This slight indentation helps the marshmallow stay in place.
- Vigilance During Marshmallow Bake: Marshmallows can go from perfectly gooey to charred in a flash. Keep a very close eye on them during the final two minutes in the oven. They should be puffed, soft, and perhaps show a delicate golden-brown tint, but avoid any dark spots.
- Mastering Glaze Consistency: The perfect glaze should be thick enough to coat a spoon and cling to the cookie but thin enough to drizzle smoothly. If your glaze is too thick, add hot water a teaspoon at a time. If it’s too thin, gradually whisk in more sifted powdered sugar until you reach the desired consistency.
Delightful Flavor and Decoration Variations:
- Peppermint Hot Cocoa Cookies: For a wonderfully festive, minty kick, add 1/2 teaspoon of pure peppermint extract to your cookie dough. Garnish with crushed candy canes instead of or in addition to sprinkles for extra holiday sparkle.
- Spicy Mexican Hot Cocoa Cookies: Infuse your cookies with a warm, subtle heat by incorporating 1/2 teaspoon of ground cinnamon and a tiny pinch (about 1/8 teaspoon) of cayenne pepper into the dry ingredients.
- White Chocolate Contrast: For an elegant touch and a beautiful visual contrast, drizzle melted white chocolate over the cooled, glazed cookies. This adds another layer of sweetness and complexity.
- Mini Marshmallow Swirl: If you prefer marshmallows mixed throughout the cookie, gently fold 1 cup of mini marshmallows into the dough during the last minute of mixing, just before chilling.
- Nutty Crunch Addition: Introduce an appealing textural element and an extra layer of flavor by folding in a handful of finely chopped pecans or walnuts with the dry ingredients.
Storage and Make-Ahead for Ultimate Convenience
While these Hot Cocoa Cookies are absolutely divine when enjoyed fresh out of the oven, they also store remarkably well, making them an excellent choice for advanced meal preparation, holiday gifting, or simply having a delicious treat on hand.
- Storing Baked Cookies: Once completely cooled and the glaze has set, store your Hot Cocoa Cookies in an airtight container at room temperature. They will remain wonderfully fresh and delicious for up to 3-4 days. For best results and to prevent the glazed cookies from sticking together, you can place a piece of parchment paper between layers.
- Storing Cookie Dough: The raw cookie dough can be prepared in advance and refrigerated, tightly covered, for up to 3 days. This is a fantastic option if you like the convenience of baking fresh batches of cookies whenever the craving strikes. For longer storage, you can scoop the dough into individual balls, place them on a baking sheet, and freeze until solid. Once frozen, transfer the dough balls to a freezer-safe bag. Frozen cookie dough balls can be baked directly from frozen; simply add an extra 2-3 minutes to the baking time.
- Freezing Baked Cookies: Fully baked and glazed cookies freeze beautifully for up to 2-3 months. To freeze, arrange the cooled cookies in a single layer on a baking sheet and freeze until they are solid. Then, transfer them to an airtight, freezer-safe container or bag, separating layers with parchment paper. When you’re ready to enjoy them, simply thaw the cookies at room temperature.
Frequently Asked Questions (FAQ)
Can I use mini marshmallows instead of large ones?
While technically possible, we highly recommend using large marshmallows for this specific recipe. Large marshmallows hold their shape much better and create that desirable, distinctively gooey, melted topping without fully dissolving or spreading too thin. This gives you the quintessential “hot cocoa” aesthetic and texture that makes these cookies so special.
Why is chilling the cookie dough so important?
Chilling the dough is a critical step that should not be skipped! The refrigeration process allows the butter within the dough to solidify. This prevents the cookies from spreading excessively in the oven, ensuring they bake into thick, chewy, and perfectly formed treats rather than flat, thin discs. Chilling also gives the flavors more time to meld and develop, resulting in a richer taste, and makes the dough much easier to handle and scoop.
My glaze is too thin/thick. How can I fix it?
Achieving the perfect glaze consistency is key. If your glaze appears too thin and watery, gradually whisk in an additional tablespoon or two of sifted powdered sugar until it reaches the desired drizzling consistency. Conversely, if your glaze is too thick, add hot water one teaspoon at a time, whisking thoroughly after each addition, until it becomes smooth and easily pourable.
How can I make these cookies even more festive?
Beyond the festive sprinkles, there are several ways to enhance the holiday spirit of these cookies. Consider incorporating a tiny pinch of ground cinnamon or even a dash of almond extract into the cookie dough for extra flavor depth. For visual flair, use red and green sprinkles, or experiment with crushed peppermints for a refreshing, minty crunch. You could also drizzle contrasting white chocolate over the set hot cocoa glaze for an elegant touch.
More Irresistible Cookie Recipes for Every Occasion
The holiday season truly shines as the most wonderful time of year for baking! I find immense joy in preparing festive plates of cookies to share with neighbors, friends, and family during this special time. If you’ve fallen in love with these Hot Cocoa Cookies, I encourage you to explore some of my other cherished cookie recipes:
- Effortless Cake Mix Christmas Cookies
- Rich Chocolate Peanut Butter Cake Mix Cookies
- Classic M&M Cookies
Hot Cocoa Cookies
By: Julia Pacheco
These Hot Cocoa Cookies are an extraordinary treat: rich chocolate cookies are baked with warm, gooey marshmallows on top and generously covered with a decadent hot chocolate glaze and a sprinkle of festive cheer.
Leave a Comment
Print Recipe
Ingredients
Cookie Dough
- ½ cup (113g) butter, softened
- 12 oz (340g) semi-sweet chocolate chips
- 1 ½ cups (180g) all-purpose flour
- Pinch of salt
- ¼ cup (22g) unsweetened cocoa powder
- 1 ½ tsp baking powder
- 1 ¼ cup (275g) brown sugar, packed
- 1 tsp vanilla extract
- 3 large eggs
- 12 large marshmallows, halved
Hot Cocoa Glaze
- 2 cups (240g) powdered sugar, sifted
- 4 tbsp (56g) butter, melted
- ¼ cup (22g) unsweetened cocoa powder
- ¼ cup hot water (+ 3 tbsp extra if glaze is too thick)
- ½ tsp vanilla extract
- Festive sprinkles, for topping
Instructions
Making the Hot Cocoa Cookies
- In a microwave-safe bowl, combine ½ cup softened butter and 12 oz semi-sweet chocolate chips. Microwave in 30-second intervals, stirring thoroughly after each, until butter and chocolate are fully melted and smooth. Set aside to cool slightly.
- In a separate medium bowl, whisk together 1 ½ cups all-purpose flour, a pinch of salt, ¼ cup unsweetened cocoa powder, and 1 ½ tsp baking powder.
- In a large bowl or the bowl of a stand mixer, beat 1 ¼ cup brown sugar, 1 tsp vanilla extract, and 3 eggs until well combined. Stir in the cooled chocolate-butter mixture.
- Gradually add the dry ingredients to the wet ingredients, mixing on low speed until just combined. Do not overmix. Cover the bowl with plastic wrap and refrigerate the dough for 1-2 hours. This chilling step is essential to prevent cookies from spreading too much.
- Preheat oven to 325°F (160°C). Line a large cookie tray with parchment paper.
- Scoop chilled dough into balls (approx. 1.5-2 tbsp each) and roll gently with your hands. Place on the prepared cookie tray, ensuring cookies are about 2 inches apart. You will likely need to bake in batches.
- Bake for 11-12 minutes. While baking, cut 12 large marshmallows in half horizontally.
- After 11-12 minutes, remove cookies from oven. Immediately place one marshmallow half on the center of each cookie. Return to the oven for another 2 minutes, or until marshmallows are melty and slightly puffed, but still holding their shape.
- Let cookies cool on the tray for 2 minutes before transferring them to a wire rack to cool completely. Cookies must be fully cooled before glazing.
Crafting the Glaze
- To make the glaze, whisk together 2 cups powdered sugar, 4 tbsp melted butter, ¼ cup unsweetened cocoa powder, ¼ cup hot water, and ½ tsp vanilla extract in a bowl until smooth. Adjust consistency with more hot water (1 tsp at a time) if too thick, or more powdered sugar if too thin.
- Once cookies are completely cool, drizzle the hot cocoa glaze over each cookie. Immediately top with festive sprinkles while the glaze is still wet.
- Allow the glaze to set for at least 20 minutes before serving. Enjoy your delightful Hot Cocoa Cookies!
Nutrition Information
(Per serving, approximation only)
Carbohydrates: 39g |
Protein: 3g |
Fat: 12g |
Saturated Fat: 7g |
Polyunsaturated Fat: 1g |
Monounsaturated Fat: 3g |
Trans Fat: 0.2g |
Cholesterol: 36mg |
Sodium: 88mg |
Potassium: 141mg |
Fiber: 2g |
Sugar: 28g |
Vitamin A: 213IU |
Calcium: 41mg |
Iron: 2mg
Nutrition information is automatically calculated and should be used as an approximation. Individual results may vary.
Tried this recipe?
Let us know how it was!