
★
★
★
★
Perfect Oven Baked Bacon: Your Guide to Crispy Perfection
Julia Pacheco
Unlock the secret to consistently crispy, hands-off bacon with this incredibly simple oven-baked method. Forget the messy stovetop splatters and the constant flipping; baking bacon in the oven is not only cleaner but also yields perfectly cooked strips every single time. It’s the easiest, most stress-free way to prepare bacon for any meal, ensuring delicious results whether you’re making breakfast for two or feeding a crowd.
5 mins
20 mins
25 mins
6 servings
Pin Recipe
Comment
Print Recipe
Why Oven-Baked Bacon is a Game Changer
If you’ve ever struggled with cooking bacon evenly on the stovetop, dealing with scorching hot oil, or having strips that are either too chewy or burnt, then oven baking is about to revolutionize your breakfast routine. This method ensures each slice cooks uniformly, yielding consistently crisp bacon with minimal effort. The oven’s radiant heat gently cooks the bacon, allowing the fat to render slowly and evenly, resulting in that coveted crispy texture without the mess.
Beyond convenience, oven-baked bacon is incredibly versatile. It’s perfect for a classic breakfast alongside eggs and toast, a crunchy addition to sandwiches and salads, or as a savory garnish for soups. Preparing it this way frees up your stovetop for other dishes, making brunch or larger meals much easier to manage. Once you try it, you’ll wonder why you ever cooked bacon any other way!
Essential Equipment for Baking Bacon
- Rimmed Baking Sheet: A standard half-sheet pan (approx. 18×13 inches) is ideal. The rim prevents grease from spilling over into your oven.
- Oven-Safe Wire Rack: This is the secret weapon for crispy bacon! Placing the bacon on a rack allows air to circulate around each strip and lets the rendered fat drip away, preventing the bacon from frying in its own grease and ensuring even crispness.
- Aluminum Foil or Parchment Paper: Lining your baking sheet with foil or parchment paper underneath the wire rack makes cleanup an absolute breeze. The foil catches all the rendered grease, which can then be easily discarded or saved for other cooking.
- Tongs: Essential for safely transferring hot bacon from the oven to a paper towel-lined plate.
- Paper Towels: For blotting any excess grease off the cooked bacon.
Ingredients
This recipe calls for standard bacon, but feel free to experiment with different varieties to suit your taste. Thicker-cut bacon will take slightly longer to cook and yield a chewier texture, while thinner slices will crisp up faster. Choose high-quality bacon for the best flavor!
- 12 slices bacon (about 1 pound, regular or thick-cut)
Instructions
Follow these simple steps for perfectly crispy oven-baked bacon that will impress everyone at the breakfast table. The key is proper setup and paying attention to your oven, as cooking times can vary.
-
Step 1: Preheat Your Oven. Begin by preheating your oven to 400°F (200°C). This ensures the oven is at the correct temperature when the bacon goes in, allowing for quick and even cooking. While the oven preheats, prepare your baking sheet for a seamless cooking experience.
-
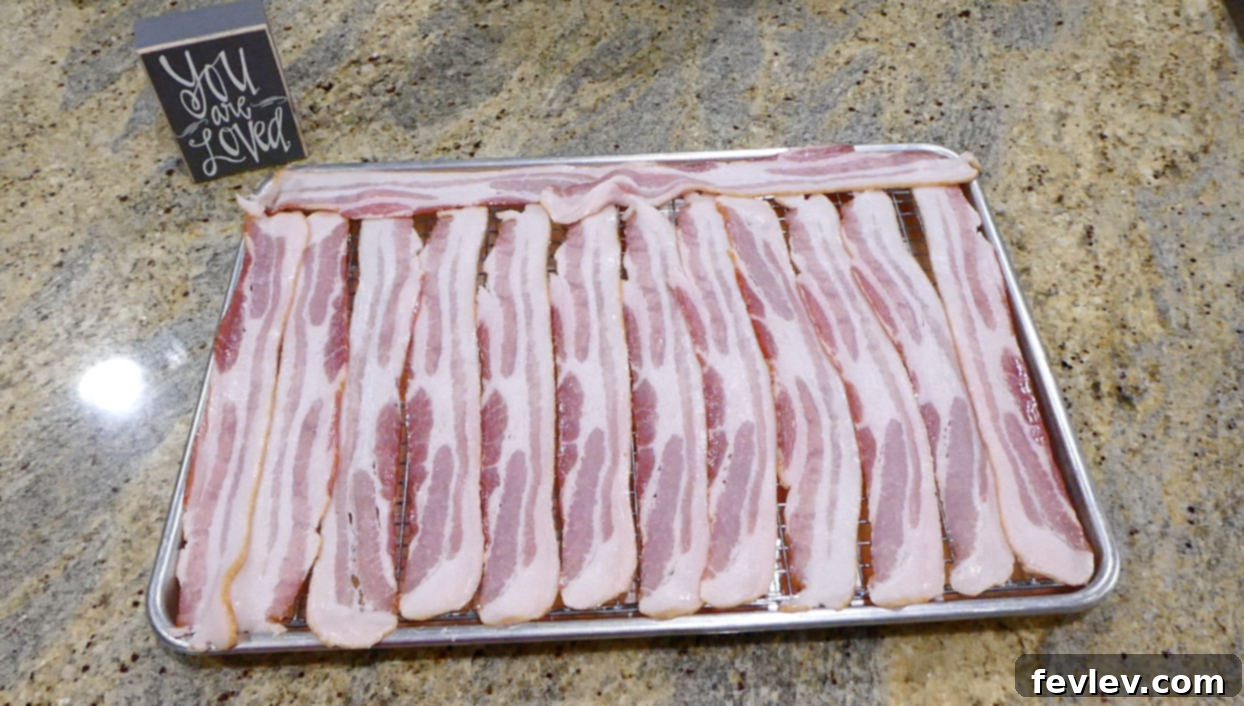
Step 2: Prepare the Baking Setup. Line a large, rimmed baking sheet with aluminum foil or parchment paper. This step is crucial for easy cleanup, as it will catch all the rendered bacon fat. Next, place a wire cooling rack directly over the lined baking sheet. The rack is essential for allowing air to circulate around the bacon, preventing it from swimming in its own grease and promoting uniform crispiness. Arrange your bacon slices in a single layer on the wire rack, making sure they do not overlap. Overlapping can lead to uneven cooking and less crispy results. For best results, give each slice a little space.
-
Step 3: Bake to Perfection. Carefully transfer the baking sheet with the bacon into your preheated oven. Bake for approximately 18 to 25 minutes. The exact cooking time will depend on several factors: the thickness of your bacon, your oven’s specific calibration, and your desired level of crispness. For thinner bacon, you might find it’s ready closer to 18-20 minutes. For thick-cut bacon, it could take up to 25 minutes or even a little longer. Keep a close eye on it, especially towards the end of the cooking time, as bacon can go from perfectly crisp to burnt very quickly. Look for a deep golden-brown color and a firm, crisp texture. Once cooked to your liking, carefully remove the baking sheet from the oven.
-
Step 4: Drain and Serve. Using tongs, transfer the cooked bacon slices from the wire rack to a plate lined with several layers of paper towels. The paper towels will absorb any excess grease, making your bacon even crispier and less oily. Serve immediately and enjoy the perfect crispy bacon!
Video: 5 Easy Breakfast Meal Prep Ideas
For more breakfast inspiration and to see bacon being prepared as part of a meal prep, check out this helpful video from Julia Pacheco. It highlights various simple grab-and-go recipes that complement your perfectly baked bacon.
Tips for the Crispiest Oven Baked Bacon
- Start with a Cold Oven (Optional but Effective): Some chefs swear by placing the bacon in a cold oven and then turning it on. This allows the fat to render out more slowly, resulting in exceptionally flat and crisp bacon. If you choose this method, add an extra 5-10 minutes to the total cooking time, depending on your bacon’s thickness.
- Don’t Crowd the Pan: Give each bacon slice ample space to breathe on the wire rack. Overcrowding will steam the bacon rather than crisp it. If you need to cook a large batch, use two baking sheets.
- Pat Dry Before Baking: A quick pat with paper towels can remove excess moisture from the bacon, helping it crisp up more effectively.
- Save the Bacon Fat: Don’t discard that flavorful rendered fat! Once cooled, strain it through a fine-mesh sieve into an airtight container and store it in the refrigerator. It’s excellent for cooking eggs, sautéing vegetables, or adding flavor to cornbread and gravies.
- Sweet and Spicy Variation: For a delightful twist, sprinkle a little brown sugar or a pinch of cayenne pepper over the bacon before baking. This adds a fantastic caramelized or zesty kick.
Frequently Asked Questions About Oven Baked Bacon
- Can I use parchment paper instead of foil?
- Yes, absolutely! Parchment paper works just as well as foil for lining the baking sheet and makes cleanup incredibly easy. Some people prefer parchment as it’s less likely to stick to the pan or bacon.
- How do I store leftover oven-baked bacon?
- Once cooled, store any leftover bacon in an airtight container in the refrigerator for up to 3-4 days. It’s perfect for meal prepping!
- How do I reheat oven-baked bacon?
- To reheat, you can place it back in the oven at 350°F (175°C) for a few minutes until warmed and re-crisped, or gently warm it in a skillet over medium-low heat. The microwave is an option but can sometimes make it rubbery.
- Can I cook different types of bacon together?
- It’s generally best to cook similar thicknesses of bacon together. Thick-cut and thin-cut bacon will have different cooking times, so separating them will help ensure even results.
- What if my bacon isn’t getting crispy?
- Ensure your oven temperature is accurate and that you’re using a wire rack. If it’s still not crisping, you might need to extend the cooking time slightly. Remember that the bacon will crisp up even more as it cools.
Nutrition Information
|
Carbohydrates: 1g
|
Protein: 6g
|
Fat: 17g
|
Saturated Fat: 6g
|
Polyunsaturated Fat: 3g
|
Monounsaturated Fat: 8g
|
Trans Fat: 0.1g
|
Cholesterol: 29mg
|
Sodium: 291mg
|
Potassium: 87mg
|
Vitamin A: 16IU
|
Calcium: 2mg
|
Iron: 0.2mg
Nutrition information is automatically calculated and should only be used as an approximation. Individual values may vary based on specific brands and preparation methods.
Stay Connected for More Delicious Recipes!
Love this easy bacon recipe? Don’t miss out on more culinary delights and kitchen tips from Julia Pacheco. Subscribe to our newsletter to get new recipes delivered straight to your inbox every week!
Find more delicious recipes and cooking advice by exploring our site.
Tried this recipe?
Let us know how it was! Your feedback helps other home cooks!