
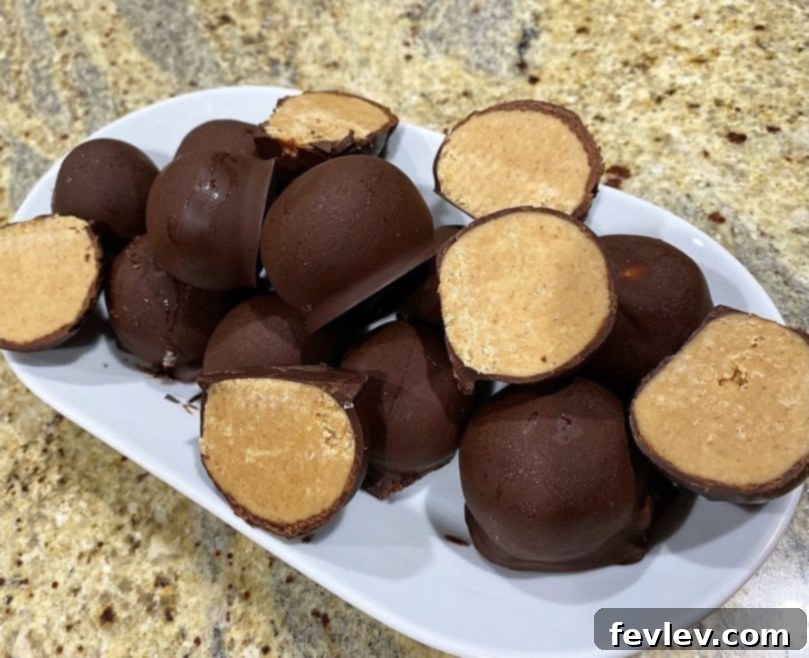
Irresistible No-Bake Chocolate Dipped Peanut Butter Balls
Julia Pacheco
Rich, incredibly creamy, and perfectly dipped in a luscious chocolate coating—these no-bake Peanut Butter Balls are the ultimate bite-sized indulgence for every peanut butter enthusiast. Effortlessly simple to prepare, they are the perfect treat for parties, holidays, or a delightful everyday snack. Dive into this beloved classic that requires no oven, just a few simple ingredients, and a little chill time for pure confectionary bliss.
5 mins
1 hour 30 mins
1 hour 35 mins
Approximately 20-24 balls (based on 7 servings, 3-4 balls per serving)
Comment
Print Recipe
Why You’ll Love These No-Bake Peanut Butter Balls
These no-bake chocolate-dipped peanut butter balls are more than just a dessert; they’re a delightful experience. Imagine biting into a velvety smooth, rich peanut butter core, perfectly complemented by a crisp shell of decadent dark chocolate. What makes them truly special is their incredible simplicity. You don’t need to be a seasoned baker to whip up a batch of these crowd-pleasing treats. With minimal ingredients and no oven required, they are the ideal solution for satisfying your sweet tooth, preparing for a last-minute gathering, or simply enjoying a moment of pure bliss.
Whether you’re hosting a holiday party, looking for an easy snack for the kids, or just craving something sweet and satisfying, these peanut butter balls are guaranteed to be a hit. Their delightful combination of sweet and salty, rich and creamy, makes them universally appealing. Plus, they store wonderfully, meaning you can always have a stash of homemade goodness ready to go. Get ready to impress your friends and family with this fuss-free, utterly delicious recipe!
Ingredients You’ll Need
Making these delightful peanut butter balls requires just a handful of common pantry staples. The quality of your ingredients can make a big difference in the final taste and texture, so choose wisely!
-
For the best results, use a standard processed creamy peanut butter (like Jif or Skippy) rather than natural peanut butter, as the oil separation in natural varieties can affect the consistency of the dough. If you opt for natural, make sure it’s well-stirred and firm.
-
Ensure your butter is truly softened to room temperature for smooth incorporation, but not melted. This helps achieve that perfectly pliable dough.
-
Powdered sugar provides the essential sweetness and a smooth, melt-in-your-mouth texture for the peanut butter filling. Sifting it can help prevent lumps, though it’s often not strictly necessary.
-
Dark chocolate offers a beautiful contrast to the sweet peanut butter, but you can use semi-sweet or milk chocolate if you prefer a sweeter coating. High-quality chocolate will give you a better melting consistency and flavor.
-
This is key for achieving a smooth, glossy chocolate coating that hardens quickly. Refined coconut oil is preferred as it has no coconut flavor, but unrefined can be used if you enjoy the tropical hint.
These simple ingredients combine to create a truly magical dessert. Ensure all your ingredients are fresh for the best flavor!
Step-by-Step Instructions for Perfect Peanut Butter Balls
Follow these easy steps to create your own batch of delightful chocolate-dipped peanut butter balls. Precision in measurements and chilling times will lead to the best results!
-
Step 1: Prepare the Peanut Butter Mixture
In a medium-sized mixing bowl, combine the creamy peanut butter and softened unsalted butter. Use a sturdy spoon, spatula, or an electric mixer on low speed to thoroughly mix these two ingredients until they are completely smooth and well-incorporated. The mixture should be uniform in color and consistency before moving to the next step.
-
Step 2: Add Powdered Sugar and Form Dough
Gradually add the powdered sugar to the peanut butter and butter mixture. Start with about half, mix until combined, then add the rest. Continue to mix until all the powdered sugar is fully incorporated and the mixture forms a thick, pliable dough. It should be firm enough to handle and roll, but still soft. If it’s too sticky, you can add a tiny bit more powdered sugar (a tablespoon at a time). If too dry, a tiny bit more peanut butter or butter.
-
Step 3: First Chill – Firming the Dough
Once your peanut butter dough is perfectly combined, cover the bowl with plastic wrap and refrigerate it for at least 30 minutes. This chilling period is crucial as it helps the dough firm up, making it much easier to roll into balls without sticking to your hands. Don’t skip this step!
-
Step 4: Roll the Balls and Second Chill
Line a large baking sheet with parchment paper or wax paper. Remove the chilled peanut butter dough from the refrigerator. Using a small cookie scoop or your hands, roll the dough into 1-inch (about 2.5 cm) balls. Try to make them as uniform in size as possible for even dipping and a professional appearance. Place the rolled balls onto the prepared sheet pan. Once all the dough is rolled, return the sheet pan with the peanut butter balls to the refrigerator for another 1 hour. This second chill ensures they are thoroughly firm and cold, which prevents them from melting when dipped into the warm chocolate.
-
Step 5: Prepare the Chocolate Coating
In a microwave-safe bowl, combine the dark chocolate chips and coconut oil. Microwave in 30-second intervals, stirring thoroughly after each interval. Continue this process until the chocolate is completely melted and smooth, with no lumps. The coconut oil helps to thin the chocolate slightly, making it easier to dip and ensuring a smooth, glossy finish that hardens beautifully.
-
Step 6: Dip and Final Chill
Carefully remove the chilled peanut butter balls from the refrigerator. One by one, dip each peanut butter ball into the melted chocolate, ensuring it’s fully coated. Use a fork or a dipping tool to gently lift the ball out, allowing any excess chocolate to drip off. Place the dipped peanut butter balls back onto the parchment-lined sheet pan. Once all balls are dipped, refrigerate for at least another hour, or until the chocolate has fully set and is firm to the touch. This final chill locks in the flavor and gives them their perfect texture.
-
Step 7: Enjoy and Store
Once the chocolate has hardened, your delicious no-bake peanut butter balls are ready to enjoy! For optimal freshness and to maintain their firm texture, store them in an airtight container in the refrigerator. They are fantastic as a quick treat, a dessert for guests, or a wonderful homemade gift.
Recipe Video Tutorial
Watch this video to see the process of making these delightful peanut butter balls, along with other easy no-bake desserts. Visual guidance can often make the baking (or no-baking!) process even smoother!
Tips for Perfection & Delicious Variations
Achieving the Perfect Peanut Butter Ball:
- Consistent Rolling: For uniformly sized balls, use a small cookie scoop (about 1 tablespoon) or a kitchen scale to portion out the dough.
- Chilling is Key: Don’t rush the chilling steps. Cold dough and cold balls are essential for easy rolling and dipping, and for the chocolate to set quickly and smoothly.
- Chocolate Quality: High-quality chocolate chips or baking bars will melt more smoothly and taste better. For a truly professional finish, consider tempering your chocolate, although simply melting with coconut oil works great for home bakers.
- Dipping Technique: Use a fork or a special dipping tool to submerge and retrieve the balls. Tap off excess chocolate gently against the side of the bowl before placing them back on parchment paper.
- Avoid Water: Ensure your bowl and tools are completely dry when melting chocolate. Even a tiny drop of water can cause chocolate to seize and become clumpy.
Creative Variations & Customizations:
- Different Coatings: Instead of dark chocolate, try milk chocolate, white chocolate, or even a mix. You can also drizzle melted white chocolate over the dark chocolate for a decorative touch.
- Flavor Boosters: Add a pinch of sea salt to the peanut butter mixture for an enhanced sweet and salty flavor. A teaspoon of vanilla extract can also deepen the flavor profile.
- Crunch Factor: For a delightful texture, gently mix in finely chopped peanuts, mini chocolate chips, or even some crispy rice cereal into the peanut butter dough.
- Decorative Toppings: Before the chocolate sets, sprinkle with flaky sea salt, colorful sprinkles, crushed nuts, or a dusting of cocoa powder.
- Nut Butter Alternatives: If you have allergies or prefer other flavors, almond butter or cashew butter can be substituted for peanut butter, though the texture might vary slightly.
- Vegan Option: To make these vegan, use a plant-based butter substitute and ensure your chocolate chips are dairy-free.
Storage Instructions
These peanut butter balls are perfect for making ahead! Proper storage ensures they remain fresh and delicious for days.
- Refrigerator: Store the finished peanut butter balls in an airtight container in the refrigerator for up to 1-2 weeks. Separate layers with parchment paper to prevent sticking.
- Freezer: For longer storage, place the chocolate-dipped balls in a single layer on a parchment-lined baking sheet and freeze until firm (about 1-2 hours). Once frozen, transfer them to a freezer-safe airtight container or zip-top bag. They can be stored in the freezer for up to 3 months. Thaw in the refrigerator or at room temperature for about 15-30 minutes before serving.
Frequently Asked Questions (FAQ)
- Can I use natural peanut butter?
- While you can, it’s generally not recommended for this recipe. Natural peanut butter (especially the kind that separates) tends to be oilier and can result in a greasier dough that’s harder to handle and set. For best results, stick to processed creamy peanut butter.
- My peanut butter mixture is too sticky, what should I do?
- If your dough is too sticky to roll, add a tablespoon or two more of powdered sugar until it reaches a manageable consistency. Ensure your butter was softened, not melted, and the dough has been sufficiently chilled.
- Can I skip the coconut oil in the chocolate?
- The coconut oil helps the chocolate melt smoothly and harden quickly with a nice sheen. While you could technically omit it, your chocolate might be thicker and harder to work with, and the coating might not be as smooth or shiny.
- How many peanut butter balls does this recipe make?
- This recipe yields approximately 20-24 peanut butter balls, depending on the size you roll them. The stated 7 servings are an estimation, typically assuming 3-4 balls per serving.
- Can I make these ahead for a party?
- Absolutely! These peanut butter balls are an excellent make-ahead dessert. You can prepare them a few days in advance and store them in the refrigerator, or even freeze them for longer periods as described above.
Nutrition Information
Carbohydrates: 54g |
Protein: 11g |
Fat: 41g |
Saturated Fat: 21g |
Polyunsaturated Fat: 5g |
Monounsaturated Fat: 12g |
Trans Fat: 0.4g |
Cholesterol: 26mg |
Sodium: 266mg |
Potassium: 391mg |
Fiber: 3g |
Sugar: 43g |
Vitamin A: 303IU |
Vitamin C: 0.1mg |
Calcium: 107mg |
Iron: 1mg
Nutrition information is automatically calculated and should only be used as an approximation. Actual values may vary based on specific ingredients and preparation methods.
Tried this delightful recipe?
Let us know how it turned out! Your feedback helps other home cooks.